


How do you celebrate Independence Day with your kids? By making a celebratory dessert snack like the fourth of July cake pops!
You can make cake pops for every occasion. Birthdays, parties, easter, and even Christmas!
If you have never made cake pops before I’m going to walk you through the process because it’s super easy.
Let me show you how to make 4th of July cake pops for your littles to celebrate in a special way!
Disclosure: Bear in mind that some of the links in this post are affiliate links and if you click on them to make a purchase I will earn a commission. Keep in mind that I link these companies and their products because of their quality and not because of the commission I receive from your purchases. The decision is yours, and whether or not you decide to buy something is completely up to you.
How To Make 4th Of July Cake Pops
How To Melt Chocolate For Cake Pops
Before I begin to tell and show you how to make 4th of July cake pops you will need a few cooking supplies! There are many different ways to melt chocolate.
While you can always just use a microwave-safe bowl for melting chocolate in your microwave, I prefer not to.
Since the microwave is meant to be a fast way to heat food, it’s very easy to burn chocolate you’re melting even in 30 second cook time intervals with 50% power.
Also, microwaving chocolate for cake pops or other fun snacks doesn’t give the melted chocolate the same “smoothness” in texture making it difficult to work with.
For these 4th of July cake pops, I used the Mini Dipper from Crockpot.
This is by far a slow method of melting chocolate. However, the consistency of the chocolate was extremely pliable, smooth, and perfect for dipping cake pops into and covering them.
But just in case you do not have a Mini Dipper Crockpot, doesn’t mean you can’t make cake pops.
When melting chocolate for snacks, desserts, and dipping it’s always best to melt them slowly compared to the microwave.
Here are a few other options you can use for melting chocolate:
A Candy Melter- These are specifically meant for melting chocolate slowly without burning it. You can even purchase silicone inserts to make clean-up a breeze.
Simply let the hot chocolate cool down, harden, then remove the insert, squeeze it, and the chocolate will simply fall out!
A Double Boiler- This is considered an older, but tried and true method for melting chocolate. While it is easy to set up a double boiler, you do need to monitor closely!
The chocolate needs to be stirred frequently and the temperature may need to be adjusted. This is where a candy thermometer works best!
Whatever method you decide to use all depends on your preference!
Once you have your preferred supplies for melting chocolate it’s time to grab the other ingredients you need!
Cake Pop Ingredients Needed
For these 4th of July cake pops you will need the following ingredients:
- 1 box of white cake mix (oil and eggs to make the cake)
- A variety of 4th of July sprinkles
- Almond bark
- Premade white frosting
Now that you’re ingredients are gathered you can move on to learning how to make 4th of July cake pops!
Step 1: Make The Cake
The first step you are going to want to do first is to follow the directions to make the white cake on the back of the box. Set your oven to the appropriate temperature.
Combine the cake mix with the appropriate amount of oil and eggs the cake mix recipe calls for.
After you’ve thoroughly mixed the cake batter together (with no lumps of powder cake mix), pour into a circular or square cake pan.
(What baking pan you use all depends on the cook times associated with pan sizes located on the back of the cake mix box).
I used two 9 inch circular pans for one white cake mix.
While the cake is cooking set your time and move on to melting chocolate for the cake pops.
Related Articles: How To Save Money On Groceries
25 Amazing Slime Add In Ideas
The Gigantic List Of Slime Add Ins: Taste Safe!
Step 2: Melt The Chocolate
For this recipe, I decided to use squares of Almond Bark. Why? The taste is delicious and very creamy smooth!
Start by breaking apart enough Almond Bark squares to fill your Candy Melter, double boiler, or Mini Dipper Crockpot.
I used a Mini Dipper Crockpot and set it on high heat with a cover, then checked it every 30 minutes.
For the Mini Dipper, it took close to an hour to fully melt the chocolate.
To know when the melted chocolate is ready for dipping, simply take a silicone spatula and stir noting if there are any lumps.
The melted chocolate should be completely free of lumps and the consistency should be “runny.” It should easily fall off the silicone spatula.
For now, let the chocolate sit (while still monitoring the chocolate) and move on to crumbling the cake.


Step 3: Crumble The Cake
After your cake has finished baking, leave your cake to sit out till it’s completely cooled down. The cake will need to be completely cooled before working with it!
I left mine in the baking pan to cool. But you can always place the cake on a wire rack as well!
Now, take a fork and begin the scrape the cake to “crumble” the center of the cake.
Remove the crumbles and place them in a mixing bowl. Don’t crumble the outside or bottom of the cake!
The sides and bottom of the cake tend to not stick together when you roll the cake into balls.


Step 4: Add White Frosting
Combine half of the premade white frosting with the crumbled cake in a mixing bowl.
For this step, you can either use a silicone spoon or spatula to mix it all together.
But eventually, you will have to mix the frosting in my hand to be able to coat all the cake crumbles.
Extra tip: The more cake crumbles you have the more frosting you will need to be able to form cake pops. However, only add small amounts of frosting at a time! Otherwise adding too much frosting will cause the cake pops to break apart when dipped in chocolate.
Trust me, I had to make this recipe two times to get it right with the ratio of frosting with cake.
It’s devastating to see your cake pops fall apart because there’s too much frosting weighing the cake pops down.
Step 5: Roll Into Balls
When rolling the cake crumbles into balls you have two options: Use a cookie scoop or your hands.
I actually used both to roll the cake balls.
I scooped them with the cookie scoop to get the exact size then rolled them in my hands to make sure the cake crumbles are packed tight.


Step 6: Freeze Them
This is an important step for how to make 4th of July cake pops! And a tricky step as well!
You need to place your cake balls on parchment paper and a cookie sheet and place them in the freeze for 15 to 30 minutes.
I froze the cake balls for 30 mins total and this was a perfect time. They didn’t break apart in the chocolate!
Step 7: Get Ready To Dip
By this step, your Almond Bark should be completely melted either from a double boiler, candy melter, or mini dipper Crockpot.
Now, grab your cake balls out of the freezer, premade frosting, and the cake pop sticks.
Important Tip: Dip the cake pop stick ends into the premade frosting, then insert halfway through the cake balls.
After you’ve dipped the cake pop sticks into the frosting and inserted them into all the cake balls it’s time to move on to coating the cake pops with chocolate!
Step 8: Start Dipping In Chocolate
This step will be combined with step 9! You will need to work quickly during these two steps with dipping the cake balls in chocolate!
You will need a Styrofoam block to place the cake pop sticks in.
To dip the cake balls in the melted chocolate, simply hold them by the sticks and “roll” the cake pop in the chocolate.
Once it’s completely coated place the stick into the Styrofoam block so the cake pop is standing up.


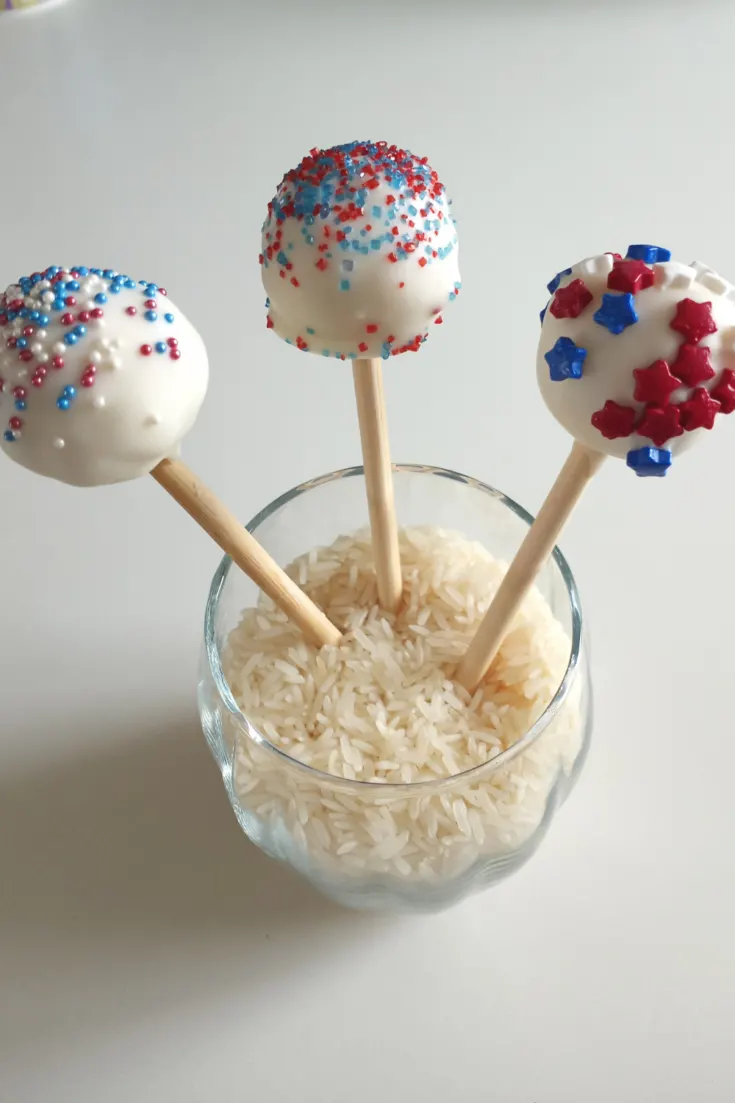
Step 9: Decorate With Sprinkles
After I dipped each cake pop in chocolate and stood it up in the Styrofoam block, I decorated them individually with fourth of July sprinkles.
I would recommend putting sprinkles on after you dip each cake pop. This will allow the sprinkles to adhere to the cholate before it dries completely.
This also allows you to do different types of fourth of July sprinkles on each cake pop!
Related Articles: How To Make A Calm Down Kit
St. Patrick’s Day Door Wreath: Dollar Tree Edition!
How To Make A Valentine’s Day Tulle Wreath
Step 10: Enjoy
Now that you know how to make 4th of July cake pops, you can serve these right away for a backyard BBQ, an after-dinner dessert, or a quick celebratory snack!
Remember to save this recipe for your fourth of July celebration or for any time you simply want to make cake pops!
While I choose to do fourth of July sprinkles, there are a million ways to decorate cake pops!
Get creative and start crumbling, rolling, dipping, and decorating away!

4th Of July Cake Pops
These fourth of July cake pops are the perfect way to celebrate Independence Day! Take them to backyard BBQ's and parties for a satisfying and sweet dessert snack!
Ingredients
- -1 box of white cake mix
- -4th of July sprinkles
- -Almond Bark
- -Premade frosting
Instructions
- Cook the cake by following the cake box directions. Wait for the cake to cool.
- Place Almond Bark in a double boiler/Candy Melter/Mini Dipper Crockpot to melt.
- Crumble the inside of the cake with a fork and place in a mixing bowl. (Do not crumble the sides or bottom of the cake).
- Add half of the premade white frosting to the cake crumbles in the mixing bowl and mix with your hands.
- Roll or scoop into 1 inch balls.
- Freeze cake balls for 15 to 30 minutes.
- Take the cake pops out of the freezer; dip the cake pop stick ends into the frosting and push the end through each cake pop.
- Hold each cake pop b the stick and dip and roll the cake pop until it's covered with chocolate.
- Push the cake pop stick through the Styrofoam block to stand them up.
- Immediately top with 4th of July sprinkles after dipping each one in melted chocolate.
- Allow the chocolate to harden and store (covered) at room temperature or in the fridge for up to 2 weeks.
Notes
There are many steps involved in the cake pop making process. However, they are well worth it! Don't be overwhelmed with all the steps and give them a try for a fun new dessert or snack!